
How to Hold Your Work When Setting Stones
Apr 15, 2023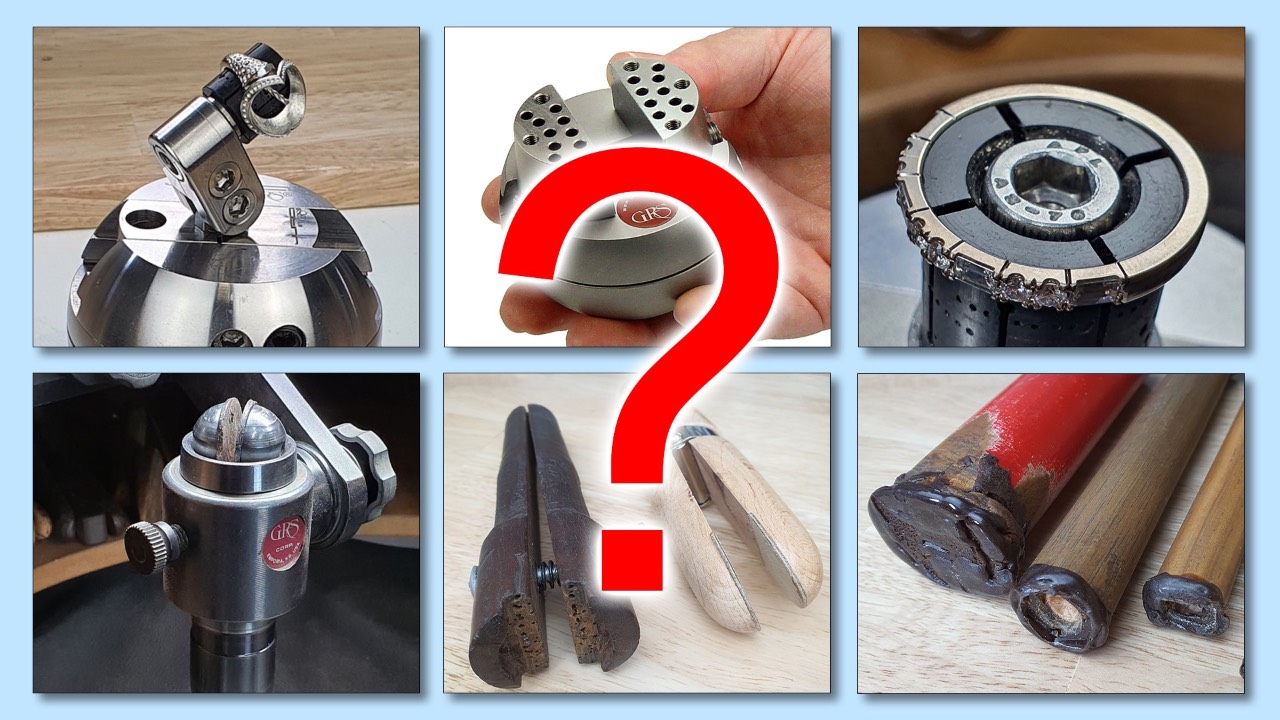
There’s an old adage that “if you can’t hold it, you can’t set it”, and if you’ve done much stonesetting before you’ll understand just how frustrating an ineffective workholding method can be, and how much it could be hurting your profitability.
It's essential that you can hold your work securely when setting. The way you hold a job will depend on the type of mount you're setting, and the type of bench you're on. Rather than going in-depth on each method, this article is an overview of the different methods and tools that are used. I hope you'll pick up a couple of new ideas that you can use on your own bench!
Holding methods
Think of the holding method as the actual mechanism for holding the item, regardless of the device being used. Setters need to use all of these methods for holding different types of work.
Outside clamping
This is anything that holds from the outside by pressing inward from opposing directions - a standard ring clamp or vise jaws, or a clamp that's been cut out to hold an item of a particular shape.
It's best for any setting that will have a lot of sideways pressure applied to it, like a large claw setting or a bezel that will need to be pushed inward a lot. It's also a quick way to hold, so it's useful for items that need to be taken out of the clamp frequently.
The jaws may be bare steel or wood, or may be lined with leather.

Bronze practice ring clamped firmly by the sides
Inside clamping
Inside clamping is usually for rings - an insert is put inside the ring, then it expands to hold it. Some models hold the ring vertically, and others hold it horizontally so you can work on the side.

Ring inside-held vertically as the outside surface is set

Ring inside-held horizontally when side details are being engraved
Inside clamps tend to give better access to the mount (usually a ring) but can stretch or break a ring that isn't strong enough. They can also be a problem for fitted wedders or any non-flat design that can stretch easily.
They give good resistance to flex and vibration when downward pressure is applied, which makes them the default choice for power-assist work. It's also possible to leave the insert slightly loose so the ring can turn freely in the vise or clamp when marking out and drilling.
They're not great for any setting that needs to have a lot of sideways pressure put on it, because the ring can suddenly slip on the insert and cause damage to the ring, or to the setter. It's also no good for anything that isn't ring shaped.
Formed holding
This is done with any substance that can be molded to fit the shape of the mount, such as thermoplastic, shellac, hot glue or superglue.
It's used when an item can't easily be clamped. It can also be used to fill or support an object to prevent it flexing, bending or vibrating.

Cartier bangle held with dopping wax for pave setting
Bracing
This is when the item is held against something solid to limit its movement. Traditional setters would hold the item in a clamp or other device, then brace it against a bench peg.

Bracing your work against something solid is essential when applying force
Holding device types
These are the different types of device used to hold your work. Most setters will only use one or two of these devices, depending on the type of bench they work on - you don't need to have them all!
Finger Holding
Holding a piece in your fingers isn't much good most of the time - the mount is usually too small and your fingers are too squishy. It gives you the most freedom to move the piece around, but not enough stability for most tasks. However, I often do use hand-holding for inspection, burring the backs of holes, and polishing.

Holding a small item in fingers for inspection and polishing
Hand-held Clamps
Hand-held clamps are great for working on a traditional bench. They give good freedom of movement, and because they're so cheap, you can have many different types in the drawer to choose from. They can hold from the inside or from the outside and be easily modified for holding specific things like earrings and bangles. They need to be firmly braced against something solid - usually your bench peg. I prefer a setter's U-shape peg for this, which can be easily swapped over if you're using a GRS mounting plate.

Two types of handheld clamp
They do have limitations though. You'll only have one hand free, so you can't use a hammer and punch, and they're difficult to use under the magnification of a microscope.
Ball Vise
The ball vise is the most popular choice for setters who work under a microscope full time.
It's important to distinguish between the larger models and the smaller models.
The large models are more stable, which is useful if you're hand-pushing or using a hammer and punch. The problem is, their weight makes them harder to move around to reposition under a microscope.
The small models are most popular for setters who use a power-assist handpiece. They can be quickly and easily slid around under the scope, which compensates for the limited viewing area that the microscope allows. The disadvantage with the smaller sizes is that they don't give as much stability for hand-pushing, so I only recommend them for power-assist use. In the GRS range, the smallest Microblock is useless for hand-push, and the Microblock-XL (the next size up) is workable but not best suited.

The heavy GRS Low Profile Vise, weight 10.7kg (23.6 lbs)

The lightweight GRS Microblock, weight 2kg (4.35 lbs)
A vise is a pretty expensive piece of kit, so it's best to choose the right size and only buy it once. Avoid buying a heavy one now, only to need a smaller one later when you upgrade to a microscope and power-assist.
Detailed information about ball vises can be found here:
https://www.standoutstonesetting.com/blog/choosing-a-ball-vise-for-stonesetting (new tab)
Pin Vise
A pin vise uses a small set of jaws to grab a wire or small tube from the outside. These can be hand-held, or mounted in a vise.

Pin vise
Benchmate
Benchmates are fantastic if you're not using a microscope. They come with inside- and outside-holding attachments. They're solid enough for a hammer and punch or power-assist. You can hold most things in them, and because they're attached to the bench via a GRS mounting plate, you can always swap back to a bench peg and hand clamps when you need too. The QCX model of Benchmate will centre correctly under a microscope, and does a good job holding rings.

An original model of GRS Benchmate
The drawback is when you want to use it under a microscope. The microscope gives you a very limited working space, and the regular benchmate models will tip the work out of the field of view every time you tilt them, which will drive you crazy, really fast. There's one model, the QCX, that does work nicely under the scope, and I did this myself for a couple of months. But inevitably I needed to hold a bangle, and a rolex, and some stud earrings, and there was just no way to do it with the benchmate. So I ended up changing to a ball vise, and never looked back.
Bench Vise
The bench vise is an option for when you need to use a hammer and punch but don't have a ball vise or benchmate. I've never done it myself, but it might just get you out of trouble in some situations when nothing else will do. If you need to set a large cabochon in a thick bezel, you can mount the piece on a wooden block with shellac and hold it in the vise to tap the edge over.

Regular bench vise
Shellac (and similar)
Shellac or dop wax is used for sticking pieces to wooden blocks or sticks, for holding and supporting the mount while setting. It's rigid, which is great, but it's also brittle and can crack, and will melt if a small item is burred too much. I tend to use thermoloc more often these days, but there are still occasions where the dop wax is best. Residue is removed with alcohol.

Shellac or dop wax can be applied to any wooden holding device
Thermoplastics
Thermoplastics like thermoloc or JetSet are plastics that become pliable at relatively low temperatures, so can be softened with hot water or a heat gun. The different types vary in rigidity, and like shellac, it can melt if you're too heavy with the bur. Some people hold items in a blob entirely made of thermoplastic, but I find this too slow and flimsy, so I always stick it to a wooden block.
As these plastics tend to be less 'sticky' than shellac, it helps to form it up around the edges of the item to improve the grip.
Residue can be rubbed off with a wooden toothpick, or dissolved with acetone if the stones will withstand it.

Superglue
Superglue is great for holding tiny things onto wooden or metal blocks with minimal interference. It's less prone to softening from the heat produced when burring, and can be useful for holding articulated pieces on a flat plane. Superglue is removed by dissolving in acetone, so consider if this is practicable for chemical-sensitive stones like opal or oil-filled emerald.

Glue is great for tapered bezel setting which can otherwise be difficult to hold

Articulated items are best held flat to ensure the tables of the stones are all on the same plane once set
Blocks
Wooden blocks are like a handle for a vice to grab onto, when the piece of jewellery itself can't be clamped. I've got a variety of sizes and shapes, and I use them with thermoloc, dop wax (or shellac) and super glue. For stud earrings or cuff links, I'll drill holes in the blocks so the pins and fittings can float inside.

Various wooden blocks, often made for specific jobs
Sticks
Wooden sticks are like wooden blocks, but for hand-holding against a bench peg. I always used them with dop wax or shellac, but they would work with thermoplastic or glue too.

A few of the many shellac sticks I used for traditional setting work
Get creative
Having the ability to set the full spectrum of jobs neatly and profitably often comes down to being able to hold things effectively. If one method isn't working, think creatively about what might work better. Often I'll combine two holding methods, or switch methods part way through a job depending on what gives better tool access and which parts of the mount need to be supported.

The open design of this ring would normally cause it to be stretched by an expanding insert, but with the help of some superglue the insert doesn't need to be tight
I hope this has been a useful overview of common workholding methods. More details about stonesetting tools are available on my blog, and if you can't find what you're looking for, why not get in touch and I'll see if I can help you.
Disclaimer
The information in this article is based on my own experience and research. There could be errors, and your own unique situation could make your needs and preferences different to mine. I can't guarantee that what works for me will work for you, or be liable for problems caused by acting on the information and views given here.
If you spot an error or missing detail, I would love to hear from you. I always give credit for significant contributions. Please contact me here.
An important part of doing good quality setting work is to have the right tools, set up and maintained in the right way. By subscribing to our mailing list below, you'll hear about new setting tips as soon as they're available!
Stay connected with news and updates!
Join our mailing list to receive the latest news and updates from our team. Don't worry, your information will not be shared.
We hate SPAM. We will never sell your information, for any reason.
